How to put together a model set
More and more it seems that photography and set building is becoming a larger part of this tabletop miniatures hobby. With many interactions between hobbyists being online, often the hard work in printing, assembling and painting comes down to a few photos posted on social media or on a forum, so its worth taking some time to develop these skills.
Thankfully, it is quite easy to get good results and show your collection in its best light, and we’ve put together a few tips to help you with your own sets.
The Brief
To start with, have a think about what it is that you want to be displaying. What are the coolest features of the model you want to highlight? How are you going to show this?
It might seem obvious in some cases but it’s worth keeping in mind. If you’re putting together a large set it can be easy to become lost and miss what you wanted to display in the first place.
For example, take the Well from Hagglethorn Hollow. We want to show its tiled roof, bucket, wheel, and tree stump.
Here, the well becomes a bit lost surrounded by all the large buildings in the town square, even though its a logical place for the well to be.
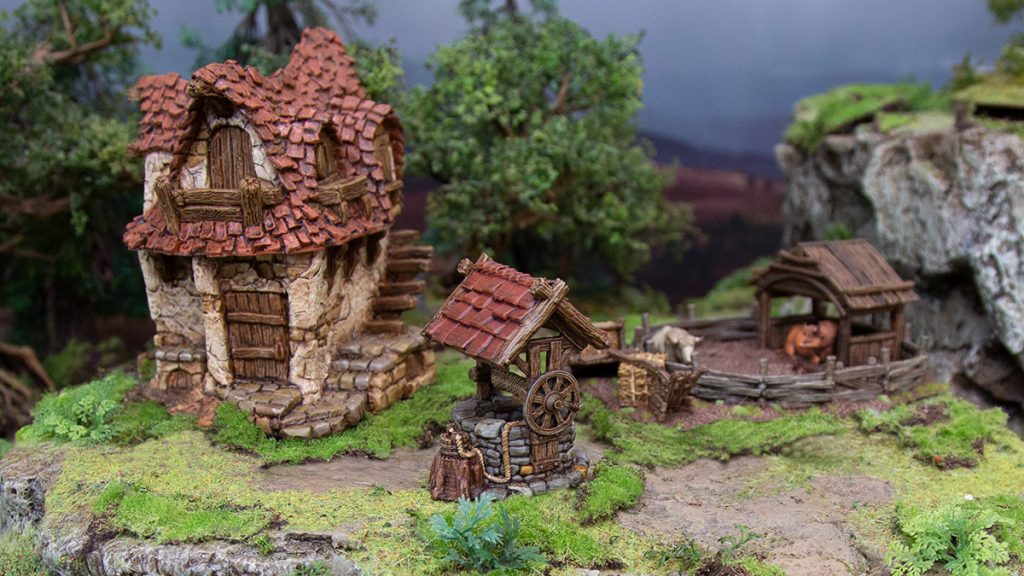
In this more rural setting, the details of the well become clearer with fewer pieces around it, and with contrasting colors behind it feels like the center of attention.
So we know what we want to show, now we need to figure out how we’re going to do it. Resources can vary greatly, and rather than presenting a list of things to purchase to make a good model set, it’s better to cover some principles. This means you can work with what you have available, and come up with some resourceful ideas too!
Building the Set
Firstly you’ve got your ground; what the models will be set upon. Any kind of flat surface will do, just aim for something that’s non-reflective. A polished dining table will throw a lot of shine into your photos whereas a material sheet won’t. The ideal surface would have a bit of texture that suits your models, without distracting from them, like a gaming board with sand and flock.
Next, it’s worth thinking about your backdrop. This encloses your world and makes it feel like it’s a place other than your hobby room. A backdrop can be as simple as a spare bed sheet hung behind the set or a landscape painting. Sometimes the best backdrops can be the real world! You can achieve great results simply by taking your model outside with a nice setting (and provided the weather is obliging)
The next stage is to loosely place the pieces you want to highlight and think about where you’re going to take your photos from. It’s good to play around with the placement of them, and sometimes make a frame with your hands to help visualize what the shot will look like. You want to ensure that you’ve got a pleasing spacing between pieces, so they don’t get crammed in together. Negative space (the empty space around a piece) is just as important as the piece itself.
A good tip is to take a few quick photos once you’re happy with your placement before you start dressing the set more. Now is the time to move anything around so it’s handy to take some quick practice photos first.

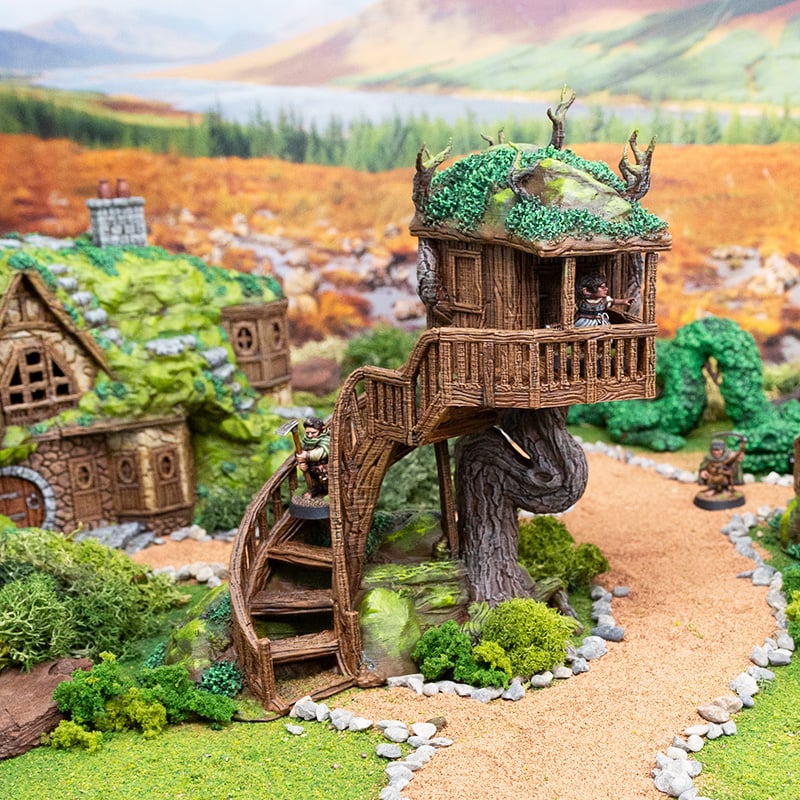
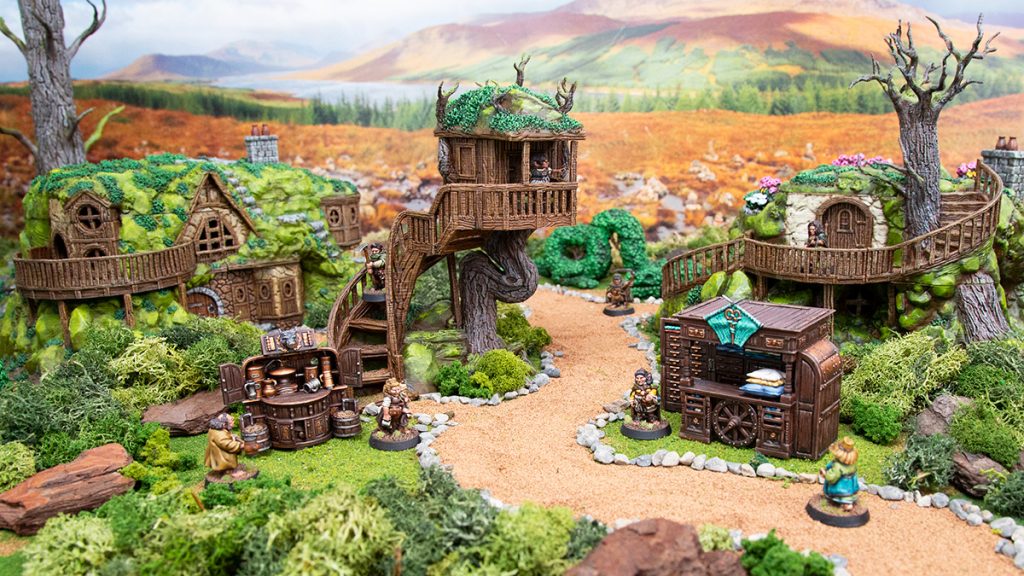
In the above example, the Tree House has been placed so the top of it sits roughly at the same height as the other tree and fills in the center space of the image nicely, giving the image balance.
Dressing the Set
So we’ve figured out what we’re taking photos of, and where we’re going to place them. Now it’s time to bring it to life.
We’ve gathered together a variety of different textures and materials from all over the place to fill in our photos. Sand, flock, treated moss, tree bark, stones, leaves, anything you can find that you think might make a good texture and fit in with your scene. It can be a bit of trial and error but also heaps of fun!
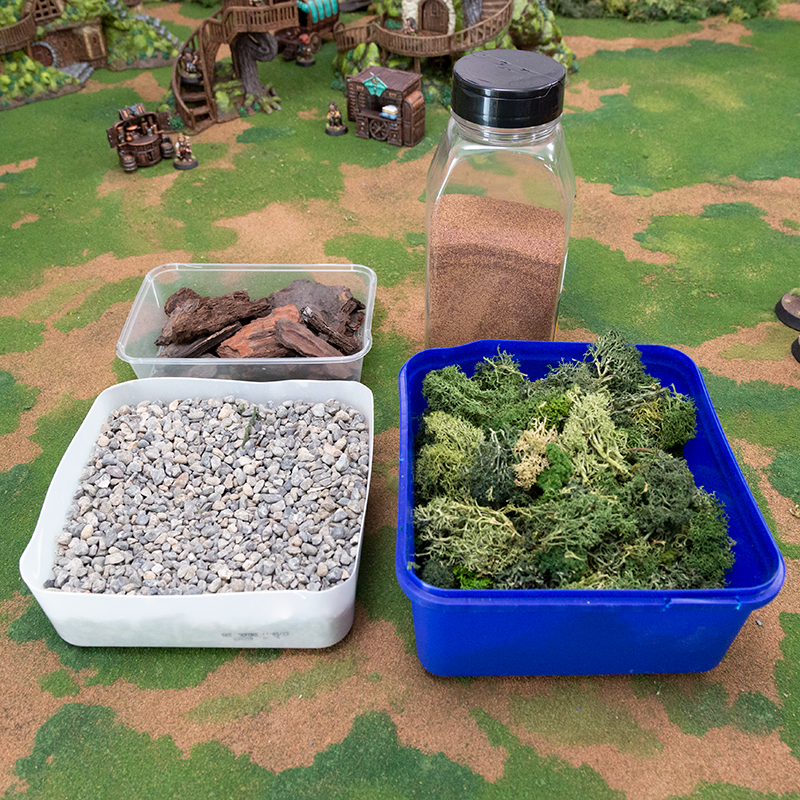
A good tip to creating an eye-catching scene is to use a variety of textures across it. This breaks up the visual and draws the eye around the scene. We tend to start from the finest texture and work our way up. So in the above picture, we laid out the ballast as the path, then put the pebbles around, the moss and finally the pieces of tree bark. It’s also a good idea to start at the back of the set and work your way forwards.
Inevitably a few things will shift around as you go. It’s important with this step to take your time and have fun! You’ll find as you go that there will be small adjustments in placement, and even some of the pieces you use. That’s all a part of the process.
Once you’re happy with how your textures are looking, it’s important to take a step back and re-assess. Sometimes it can even be good to leave the room for a minute and come back to the set. With fresh eyes check over the details, make sure your pieces are lined up the way you want and that the first thing that catches your eye is the main piece you want to show off!
Photography and Lighting
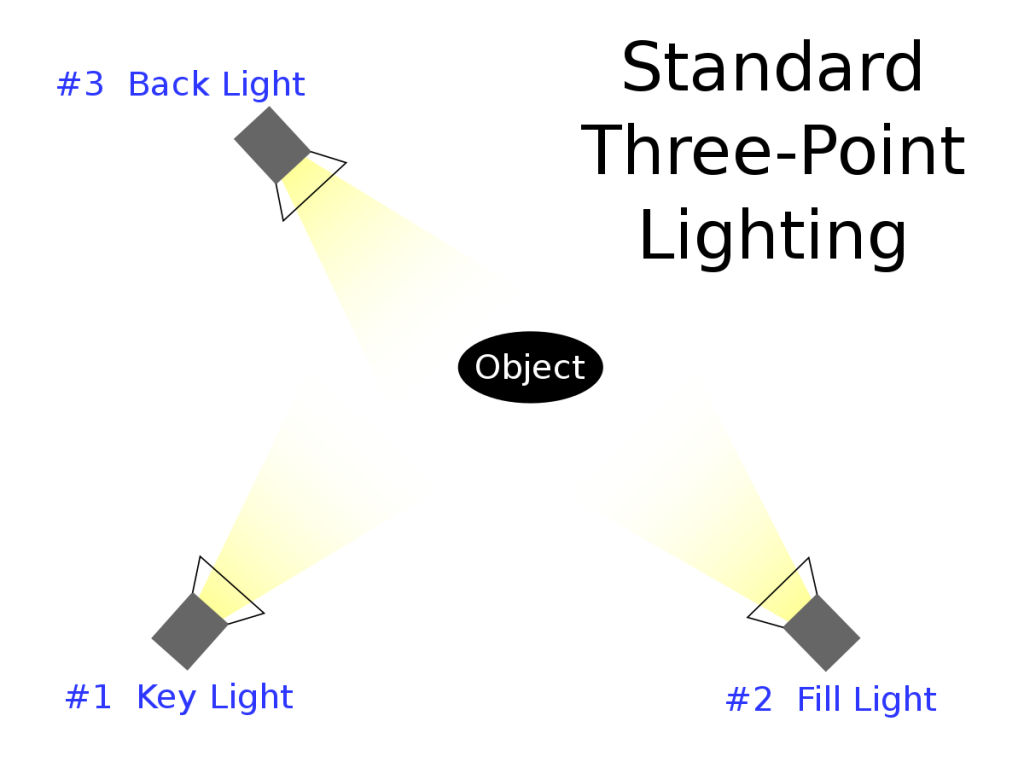
We could easily write an entire blog post on this topic, as indeed there are whole courses on photography and set lighting. The main point when it comes to lighting is to try your best to keep it evenly distributed across the set. It can help to draw your curtains and block off outside light sources, as they can be hard to control. Generally speaking, you want to aim for three light sources; a backlight, fill light and key light.
Without going into too much detail, a key light shines on the main source of your subject and is usually placed to the front, beside the camera at an angle, highlighting the main subject of your scene.
The fill light supports this, taking away the shadows that key light produces and is placed on the other side of the camera from the key light. It’s often not as strong as the dey light but work with what you have.
The back light, as the name suggests, goes behind the set and fills in the background, giving depth to the scene. Its common for the back light to be bounced off something so it doesn’t produce shadows. You can easily point it at the roof if you have a light-colored ceiling or at a piece of cloth or white sheet.
This can be achieved with many many kinds of lights, lamps or whatever you have at your disposal. Like with adding textures, play around with it until you’re happy with the result. The first time you set it up is always the most difficult and might take a bit of playing around but it’s worth the end result.
When it comes to photography most of us will be using smartphones, as they can take very good quality photos with ease. If you’ve lit your set correctly then the phone will do most of the work here. A good tip is to keep in mind your aspect ratio (1:1 or16:9 are the most common) and where you want to post it. Instagram for example, works best with 1:1 photos.
If you have access to a tripod or stand for your phone/camera then use it. When photographing miniatures, the slightest wobble of the camera will show. If you can’t use one then try and position yourself as steadily as possible, arms locked in so you are as stable as possible.
Many phones come with editing software and there are heaps of apps out there you can use. We use adobe Photoshop and Lightroom but there are great free ones out there like Snapseed and Canva to name a few. These can come in handy if your lighting is slightly off, or you want to crop your photo or make minor adjustments. Less is more when it comes to editing, let your painting and set do the talking.
We hope you found this guide useful for taking some photos of your own! It can be really satisfying bringing your prints to life. Check out the entries from the Arcane Immortals gallery, where you can see some of the principles discussed here in action!