Making your own wash
Washing is a common technique in miniature painting. It uses translucent paints with a high surface tension to run into the recesses of models, where it settles and fades out to the more raised areas of the model. The effect adds depth to your models with a minimum of fuss, making it an incredibly popular technique.
When painting terrain or any large project, you can use up quite a lot of wash, which can start to cost a lot.
We did some research and had a go at making our own wash, and you can too!
The key is to experiment and find what works for you. We started out by looking at online guides on youtube and google, finding that the key ingredients are pretty much the same. It’s just the ratios of mixing them that change.
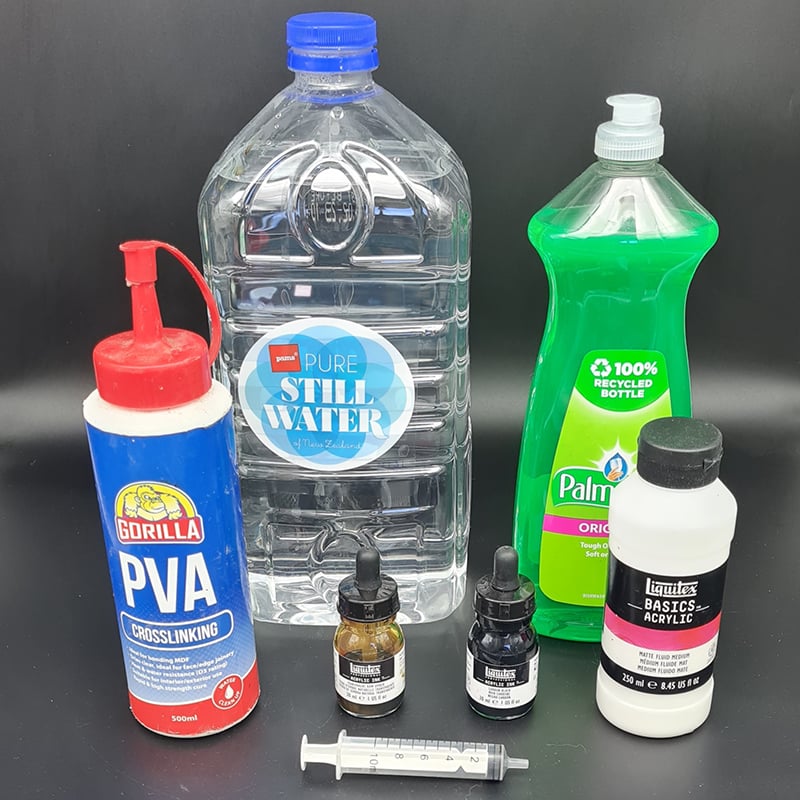
So a trip to an art supply store, hardware store and pharmacy, and we’re ready to go:
Ingredients:
Bottled Spring Water
PVA Wood Glue (the proper white glue, not art glue)
Plain Dish Soap
Artist’s Acrylic Ink (we used Burnt Umber and Black to start with)
Artists Fluid Matte Medium
A plastic syringe for measuring quantities
A suitable vessel for mixing the wash could be an old paint pot or a small jar with a lid. As long as you can securely close it
For brands, the PVA, Water and Dish Soap shouldn’t matter. Whatever is available in your country will be fine.
For the Artist Inks and Medium, we used Liquitex, available in most countries.
Mixing It Together
When it comes to putting together the ingredients, we refer to them as parts. As long as each part is the same, the ratios will be acceptable. For example, one part could be 2ml, meaning 2 parts would be 4ml, 1/2 part would be 1ml etc.
It goes the same if you’re more comfortable using fl oz instead of ml. As long as each part is consistent between ingredients, one part could be as much as you desire to make. That said, it’s good to start small and make a small amount to test and ensure you’re happy with the effect.
Measure out each part using the syringe for accuracy into the container you’ll be using to store the wash in and give it a shake (with the lid on, of course!). After shaking it up, there will be a fair amount of bubbles from the dish soap. It’s a good idea to let these settle a bit before using the wash.
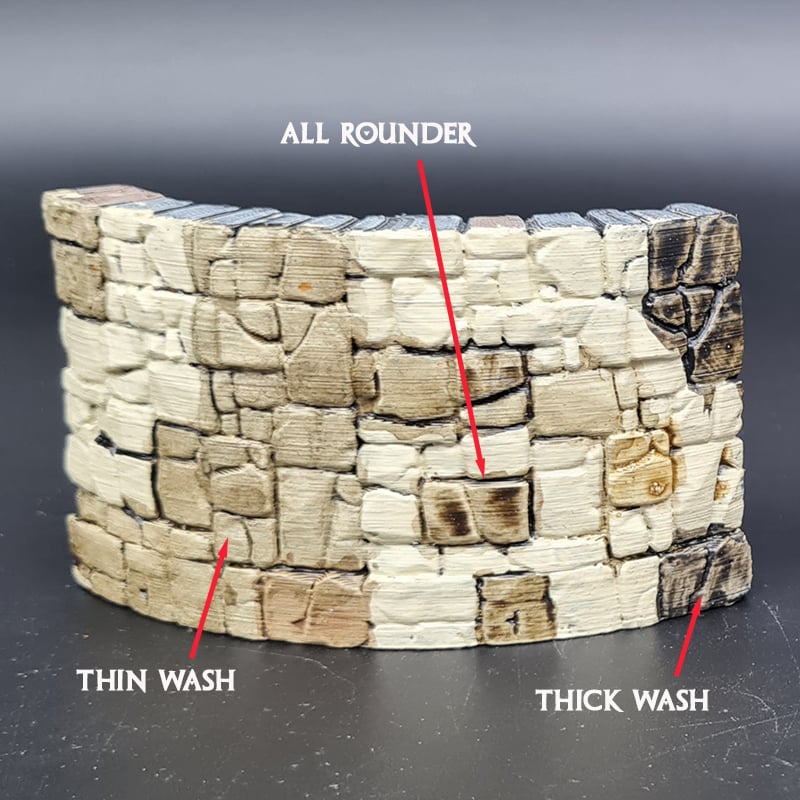
Here are some ratios we tried out:
Thin Wash
1 Part Artist Ink (even mix of black and umber)
1 Part Medium
1 Part PVA
8 Parts Water
.5 Part Dish Soap
Thick Wash
8 Part Medium
2 Part Ink
2 Part PVA
1 Part Dish Soap
1 Part Water
The All-Rounder
6 Part Medium
1 Part PVA
3 Parts Ink
2 Part Water
.25 Part Dish Soap
Trying it out
To test them out, find a spare model and basecoat it in a light color. For our test, we used a spare piece of OpenLOCK wall, and base coated it in Skeleton Bone.
These three washes will have different effects depending on what you want to achieve. If you were to make one, we’d suggest the All-Rounder, which you’ll see on our models and when we refer to our wash in painting guides.
For the Inks, try a combination of the different colors you have. For our Dark Brown Wash (pictured here), it is a 2:1 mix of Burnt Umber and Black.
As mentioned at the beginning of this article, feel free to experiment with your ratios and with different colors!
If you’ve got any feedback or suggestions, feel free to get in touch.
This works really well, thank you. I use water from my dehumidifier, rather than mineral water. I use much less dishsoap, or drop or two or else it gets foamy very easily.