Use a pair of needle nose pliers to remove them side ways rather than clipping, clipping exerts force in either direction and will separate parts of the model on the print lines.
Forgive my newb question. The “Skull Walls” set has a “P” wall, which i assume allows you to have angled corners. However, I dont see it on the above reference sheet, and I cant figure out how to use them.
Hey Matthew. The P walls are designed to be used alongside O floors to create 45 degree angles in your dungeons. As the P tiles are a later addition they don’t show up in that guide, which demonstartes just the basic tiles. I will add it to the list of updates.
When pressing openlock clips into the clorehaven floor tiles it usually breaks the posts that they’re suppose to lock into. If I make the clips thinner they won’t clip into the slots on the sides of the walls anymore.
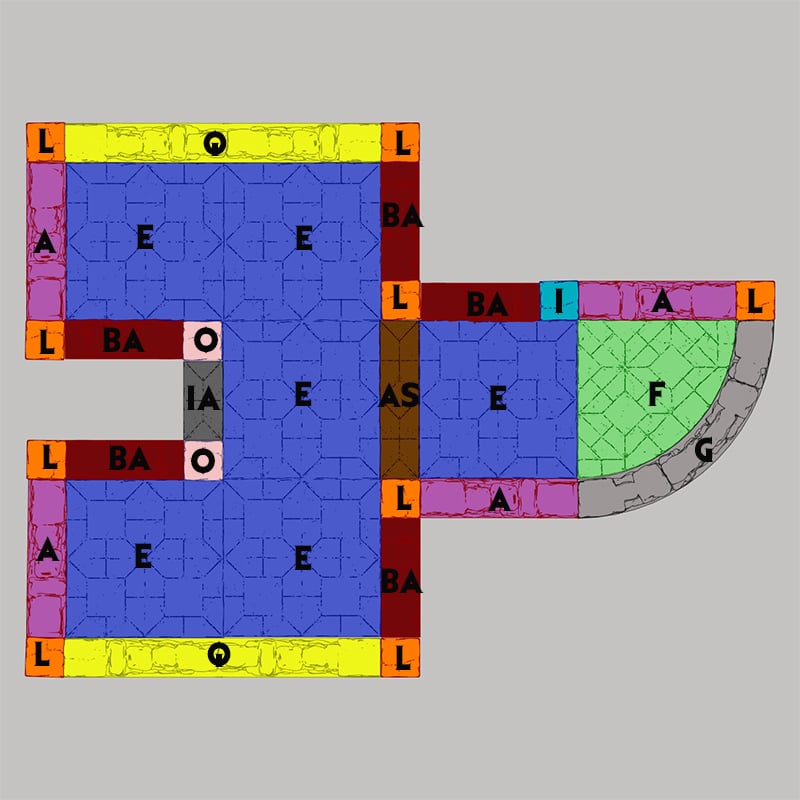
After purchasing the complete dungeon add-on and booster, I’m finding hardly any AS doors/walls? Am I missing something? The AS door use as shown in this picture is what I’m looking for.
This is an AS floor pictured, we’re looking to update some of the older sets with AS walls and doors as they’ve been introduced since this set was released.
Hey All,
Please forgive my dumb question; I am new to 3D printing scenery. I am unsure what to do with the horizontal slots on the bottom of the walls. The clip does not fit in them; even so, they seem to be facing outwards. Am I just missing something? Any help will be appreciated. Thanks
Hi Donovan,
The horizontal joints have supports you need to remove for the clips to fit in. Its best done with a pair of pliers so you’ll end up with three ports for your clips to go in.
Hope that helps
What’s the best method for removing the supports? Whenever I use clippers, it pops the back clip supports apart from the base or the top..
Use a pair of needle nose pliers to remove them side ways rather than clipping, clipping exerts force in either direction and will separate parts of the model on the print lines.
Forgive my newb question. The “Skull Walls” set has a “P” wall, which i assume allows you to have angled corners. However, I dont see it on the above reference sheet, and I cant figure out how to use them.
Hey Matthew. The P walls are designed to be used alongside O floors to create 45 degree angles in your dungeons. As the P tiles are a later addition they don’t show up in that guide, which demonstartes just the basic tiles. I will add it to the list of updates.
When pressing openlock clips into the clorehaven floor tiles it usually breaks the posts that they’re suppose to lock into. If I make the clips thinner they won’t clip into the slots on the sides of the walls anymore.
If you want to email [email protected] with a picture, we can have a look at any specific issues you’re having with your print.
After purchasing the complete dungeon add-on and booster, I’m finding hardly any AS doors/walls? Am I missing something? The AS door use as shown in this picture is what I’m looking for.
This is an AS floor pictured, we’re looking to update some of the older sets with AS walls and doors as they’ve been introduced since this set was released.
Awesome that would be great. Would love to have some heavy walls and low walls along with the heavy wall door options in AS.
Hey All,
Please forgive my dumb question; I am new to 3D printing scenery. I am unsure what to do with the horizontal slots on the bottom of the walls. The clip does not fit in them; even so, they seem to be facing outwards. Am I just missing something? Any help will be appreciated. Thanks
Hi Donovan,
The horizontal joints have supports you need to remove for the clips to fit in. Its best done with a pair of pliers so you’ll end up with three ports for your clips to go in.
Hope that helps