
Painting Guide: Clorehaven
In this painting guide, we explain the steps for painting the city of Clorehaven. This is a simple scheme that is easy to replicate across the entire range, so you can get your Clorehaven models on the tabletop looking great in no time at all.
To begin with, prime your Clorehaven models with Army Painter Matt Black. Any matt black primer you have will work, though.
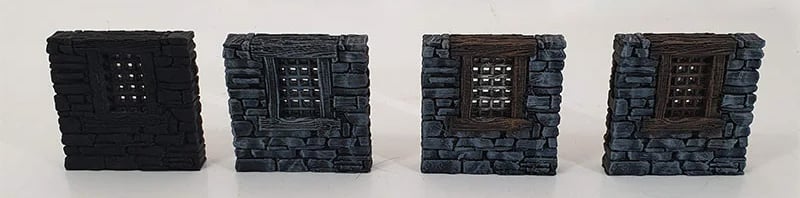
Stone
This is the scheme used on all the stone.
- Heavy dry-brush: Army Painter Dungeon Grey.
- Lighter dry-brush: Army Painter Ash Grey.
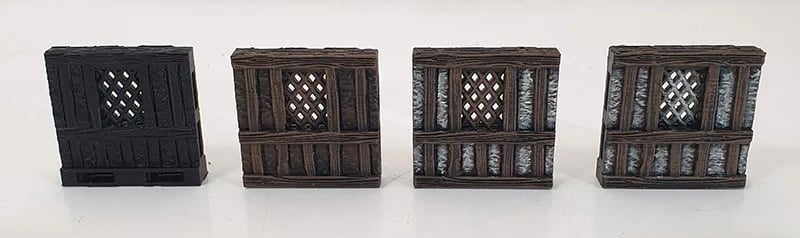
Wood & Stucco
This is the scheme used on all the wooden features
- Heavy Drybrush: Army Painter Oak Brown
- Highlight: Vallejo Khaki
- Light Drybrush on the Stucco areas: Army Painter Arid Earth.
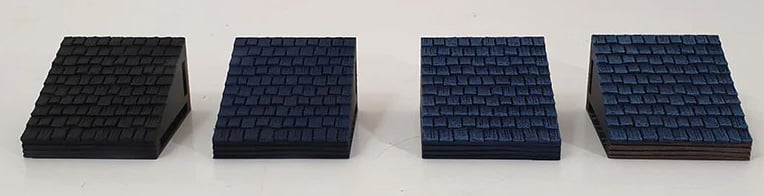
Roof
This is the scheme to paint the roofs.
- Heavy Drybrush: Army Painter Dark Sky.
- Highlight: Army Painter Wolf Grey.
With these three paint schemes, you’ll be able to paint the bulk of your Clorehaven models with ease. Let us know if there are any other paint guides you need for your Clorehaven terrain.
This is fantastic! Thank you so much! What colors were used in the stucco of the tudor walls?
Army Painter Arid Earth was used for the stucco.
What colors were used for the library roof specifically? Thank you so much for these paint schemes by the way.
The library roof was primed Black then Dragon Red and Lava Orange was used.
i cant find leather black on armypainter site. Are you sure its not leather brown ?
Thanks, this has been corrected to Army Painter Matt Black.
Trying not to be dense here but could you walk me through the process you used for the tudor pieces a bit more?
You primed in black then:
– Heavy dry brush of the entire piece (including the stucco bits?) with the oak brown
– Highlight with Vallejo Khaki. — I assume just the wood pieces?
– Light dry brush of Army Painter Arid Earth. — including the wood? It also looks like there is a pretty heavy brush of this on the stucco but I assume this is done separately?
On the tudor pieces do you do all the woods parts first then the white/yellow stucco parts?
Thank you!
Brian
Hey Macdiessel, your right with the oak brown, the khaki can be done across the whole piece and then the arid earth is only on areas with the Stucco. we did them in big batches and we found this to be the quickest way to do them.
I doubt from how long the last comment this will get answered but many tiles were you able to paint with each bottle? Love the paint style but 18 ML doesn’t feel like it go far.
It’s hard to say exactly as we paint them in large batches. If you’re worried about having enough paint and you know you’ll use a lot sometimes it can pay off to take the paint to a hardware store or paint shop and get a larger bottle color-matched. Most indoor acrylic paints work very well on miniatures.