Tagged: resin
-
AuthorPosts
-
-
August 9, 2020 at 5:37 am #227657Leto AtreidesParticipant
Originally I was browsing this forum (and others) to try and find tips and tricks to printing terrain with resin; but instead I encountered a lot of confusion and misinformation. I am _far_ from an expert in resin printing, but I thought I would prepare a document that outlines what the costs are (with actual numbers), what pitfalls to avoid, and what to do to get the best prints (with pictures). This document is specific to Printable Scenery terrain; but should be more-or-less generically applicable.
This is a living document and I hope to add to it and update it as things change or as I find better ways to get the most out of resin printing this terrain. Without further ado, here is the document:
https://docs.google.com/document/d/13dN7Gjc9mBTya5slTDBOO0V97xTJ6k0HheaDTQcK61Q/viewIf you have any suggestions or things you would like added or clarified, feel free to comment here; but please be constructive. Keep in mind that this is a learning experience for me as much as it is me helping those that might be starting the path of resin printing.
-
August 11, 2020 at 9:02 am #228010Nicholas JebsonParticipant
Man, this is an amazing comparison and how-to Leto, thank you. I am just awaiting my first resin printer (Phrozon sonic mini) so this is going to be invaluable to me.
-
August 12, 2020 at 2:16 am #228137Leto AtreidesParticipant
I am glad that you find it useful! I am trying to make resin printing less of a mystery and at the same time gather feedback and tips from other users.
Keep in mind that the Phrozon Sonic Mini has a slightly smaller build area than your common MSLA printer so there might be some larger items (like the QC or G walls) that won’t fit or will require different positioning.
-
August 12, 2020 at 9:08 am #228178Nicholas JebsonParticipant
I know, mostly i will be printing D&D miniatures on it, with maybe some of the higher detailed tiles like the shop fronts.
-
August 12, 2020 at 9:26 am #228187Leto AtreidesParticipant
That was my original use case for my resin printer too, but the first time I held a E_TRP_Stone_Floor printed on an FDM in one hand, and one printed on a resin printer in the other, I knew I could never print them on FDM again. So I set out to figure out what the actual cost is, and what the best settings are to get the most out of it.
-
August 13, 2020 at 2:58 am #228364Leto AtreidesParticipant
A lot of the information in the document will need to be updated when the resin slicers eventually support infill. Chitubox is one of the few that already supports this but you can’t make drain holes when you hollow with infill (which makes infill 100% useless).
-
August 13, 2020 at 9:12 am #228405Nicholas JebsonParticipant
which slicer do you recommend for a starter resin set?
-
August 13, 2020 at 9:27 am #228407Leto AtreidesParticipant
You don’t really have a choice for slicers. Typically a resin printer has its own custom slicer (like Prusa), or they have worked with Chitubox to add support for their printer to that slicer. With the Phrozen Sonic Mini its the latter case, you will use Chitubox (as most resin printers do).
Unfortunately Chitubox is not the best slicer, or even comparable. Its buggy, it crashes a lot, and the support generation is sub-par (requiring a lot of manual intervention).
Fortunately there is a solution to (most) of those issues and that is to use Prusa Slicer. Pretend you have an SL1. Position your model, hollow it, drill holes, and generate supports. From there you can “Export the plate as STL including supports” and then load that STL into Chitubox and just slice it. I would change the Pad Wall Slope setting in PrusaSlicer from 90 to 45 though, this will make removing your prints 10x easier.
-
August 14, 2020 at 11:06 am #228591Nicholas JebsonParticipant
Wow, thanks Leto. I’m looking forward to this, I will start small with the miniatures and work my way up to the dungeons!
- This reply was modified 5 years, 10 months ago by Nicholas Jebson.
-
August 27, 2020 at 12:46 am #230277William OakleyParticipant
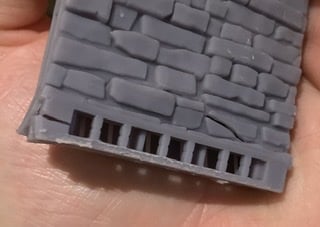
Thanks for this! I couldn’t figure out why pieces were warping at the bottom.
Here is a new issue I’m seeing. I’m using an elegoo Mars, I hollowed out the wall segments as instructed, added a drainage hole, double checked supports, but after curing, every single piece has cracked along the bottom.Curing too long?
-
August 27, 2020 at 1:26 am #230281Leto AtreidesParticipant
One of the purposes of this document (and this topic) is to have a good place for trouble shooting and knowledge gathering. I would love to help you figureout why your parts are splitting. If you could upload photos (and potentially email me your saved Chitubox project file, exactly as you have it, supports and all) I can do my best to help.
I will say that 100% of the time I have had cracking it has exclusively been because of the lack of drainage. Usually tiny little pockets that Chitubox hollows when it shouldn’t. I have cured the walls and floors for up to 8 hours in front of a UV lamp (I forget its curing sometimes….); and while they did yellow quite a bit, they never once cracked.
-
August 27, 2020 at 1:44 am #230284William OakleyParticipant
Much appreciated! What’s the best email address and I’ll get those over.
Attachments:
-
August 27, 2020 at 1:52 am #230286Leto AtreidesParticipant
In an effort to avoid scraping utilities: Look at my profile name (click on my profile, the part after the @) and add @gmail.com.
-
August 27, 2020 at 2:21 am #230287Leto AtreidesParticipant
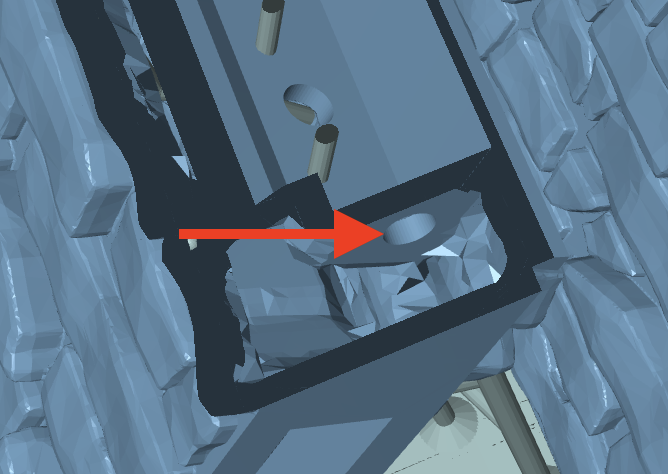
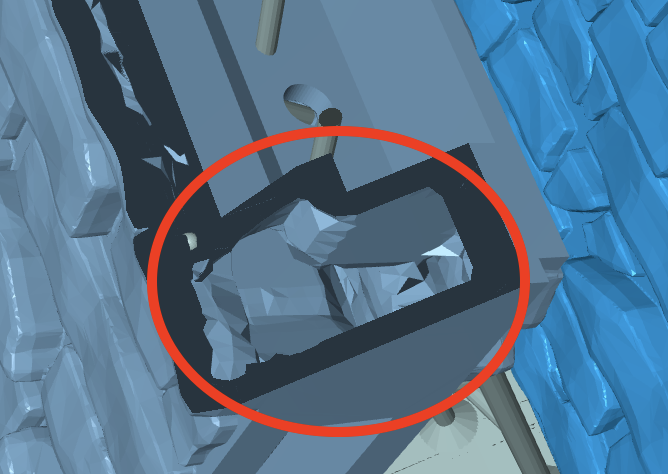
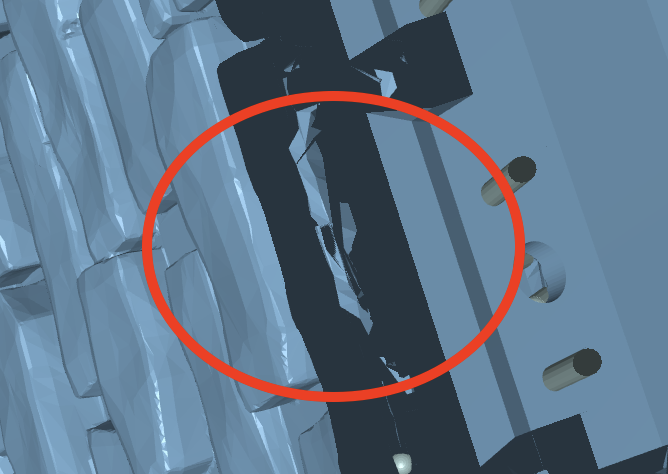
Ok, I think I see the problem. This is something you have to watch out for, even more so with Chitubox.
In this model when you hollow it out, there are actually small pockets that hollow out that are not connected to the main section, this means that they are closed sections.
The most important ones are on the bottom (see Hollow1 and Hollow3). You can solve these by putting some horizontal holes (see Hollow2).
Unfortunately there are also some very tiny pockets that you can’t really drain (because you can’t really poke a hole there). (see Hollow4). For this I would try hollowing in PrusaSlicer instead, since it will try and not hollow out these tiny spaces.
If there are _any_ closed sections that are hollowed out, those sections cannot drain and the resin that gets trapped in them will eventually cause enough pressure to bust open any print.
- This reply was modified 5 years, 9 months ago by Leto Atreides.
Attachments:
-
March 30, 2021 at 5:39 pm #268211jvarela098Participant
Lychee Slicer will change your life. It can support slicing files for tons of printers natively without having to export as stl and slice using a different program. The versatility of adding and editing supports is really helpful at not only supporting every island or overhang but also fine tuning how many supports you are actually placing to save resin.
Also, if you need any data or screenshots from larger build volumes (e.g. Saturn, Sonic 4k Mighty, Mono X, Epax E10) I have an E10 and wouldn’t mind contributing.
These are all the printers Lychee Slicer supports:
Anycubic Photon
Anycubic Photon S
Anycubic Photon Zero
Anycubic Photon Mono
Anycubic Photon Mono SE
Anycubic Photon Mono X
Anycubic Photon X
Creality LD-002R
Creality LD-002H (*)
Creality LD 006 (*)
EPAX E10 4K Mono
EPAX E6
EPAX X1
EPAX X1-DJ/K/N
EPAX X9
EPAX X10
EPAX X10 4K Mono
EPAX X133
EPAX X133 4K
EPAX X156 4K
Elegoo Mars
Elegoo Mars 2 (*)
Elegoo Mars C
Elegoo Mars Pro
Elegoo Mars 2 Pro (*)
Elegoo Saturn (*)
Hardlight Sirius 2K
Hardlight Sirius XL
iSun 3D LCD3.0
JGAURORA G3
Kelant Orbeat D100
Kelant Orbeat D200
Kelant Orbeat D200S
Kelant Orbeat S400
Kelant Orbeat S400s
Kelant S500
Longer Orange 10
Longer Orange 30
Mango Board (*)
Mang’OS (*)
MKS board
Monoprice Mini
Nova 3D Elfin
Nova 3D Elfin2
Nova 3D Elfin2 Mono SE (**)
Nova 3D Bene4
Nova 3D Bene4 Mono (**)
Peopoly Phenom
Peopoly Phenom Noir
Peopoly Phenom L
Phrozen Shuffle
Phrozen Shuffle 4k
Phrozen Shuffle Lite
Phrozen Shuffle XL
Phrozen Shuffle XL Lite
Phrozen Sonic Mini
Phrozen Sonic Mini 4K (*)
Phrozen Sonic Mighty 4K (*)
Phrozen Sonic
Phrozen Sonic 4K (*)
Phrozen Sonic XL 4K
Phrozen Transform
Prusa SL1
QIDI Shadow 5.5s
QIDI Shadow 6.0 Pro
QIDI S-box
SainSmart Kumitsu KL9
SparkMaker
SparkMakerFHD
Stek X-Cube Plus
Tianfour T215
TianFour T280
Tronxy Ultrabot
Voxelab Proxima
Wanhao D7 (**)
Wanhao D8
Wanhao Gadoso GR1
YDM 1S
* 3D printer compatible with variable layer height, transition layers.
** 3D printer compatible with variable layer height, transition layers, over-cured layer, and all advanced functions of the slicer. -
March 31, 2021 at 1:19 am #268252Leto AtreidesParticipant
Lychee Slicer is a pretty good slicer (if somewhat slow); however its always-online-phone-home and subscription service put it firmly in the “I’ll pass” category. Thankfully the more recent versions of Chitubox (1.8.1) have solved many of its problems (and as far as I can tell, its stability issues), though its still not that great at hollowing compared to Prusa.
I do have a larger build plate printer that I can run tests on; that being said I would love to have others contribute to this document.
I am learning as I go, and new slicer features can make some of the tips/tricks obsolete. If you have anything you would like to add or correct, please feel free to do so.
- This reply was modified 5 years, 2 months ago by Leto Atreides.
-
September 30, 2021 at 12:43 am #306317cathpeta42Participant
I am glad that you find it useful! I am trying to make resin printing less of a mystery and at the same time gather feedback and tips from other users.
Keep in mind that the Phrozon Sonic Mini has a slightly smaller build area than your common MSLA printer so there might be some larger items assurance dépendance (like the QC or G walls) that won’t fit or will require different positioning.
Ora capisco. Comunque, grazie mille per averci fornito queste informazioni.
- This reply was modified 4 years, 8 months ago by cathpeta42.
-
January 27, 2022 at 9:13 pm #323193AnonymousInactive
wow, this is good
-
April 7, 2022 at 3:46 am #330372Pieter StillaertParticipant
Do you guys use supports; I have this tree canopy, and I read somewhere its made to not need supports added.
It just fails when I print any of these things. So how do you print?-
April 7, 2022 at 6:12 am #330380Leto AtreidesParticipant
Something to keep in mind is that FDM and Resin printing is _very_ different. A print that may not require supports on an FDM printer may need supports on a resin printer. The opposite can also be true.
With that said, what supports you need, and how many, depends a lot on the model and a lot on the orientation on the build plate. If you have good resin, and your printer calibrated decently, then you shouldn’t fear supports because most will easily break away with little to no visible marks. Brittle resin, or improper calibration, will leave lots of circular scars (cavities) when removing support, so be mindful of your materials and setup.
Is this a tree canopy from PrintableScenery, or one freely available that you could provide a link to?
-
April 7, 2022 at 7:03 am #330382Leto AtreidesParticipant
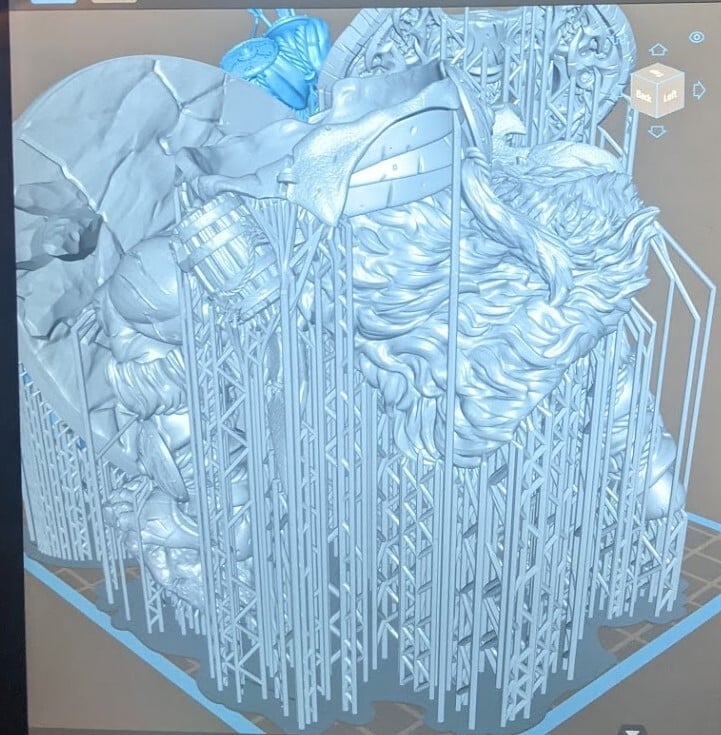
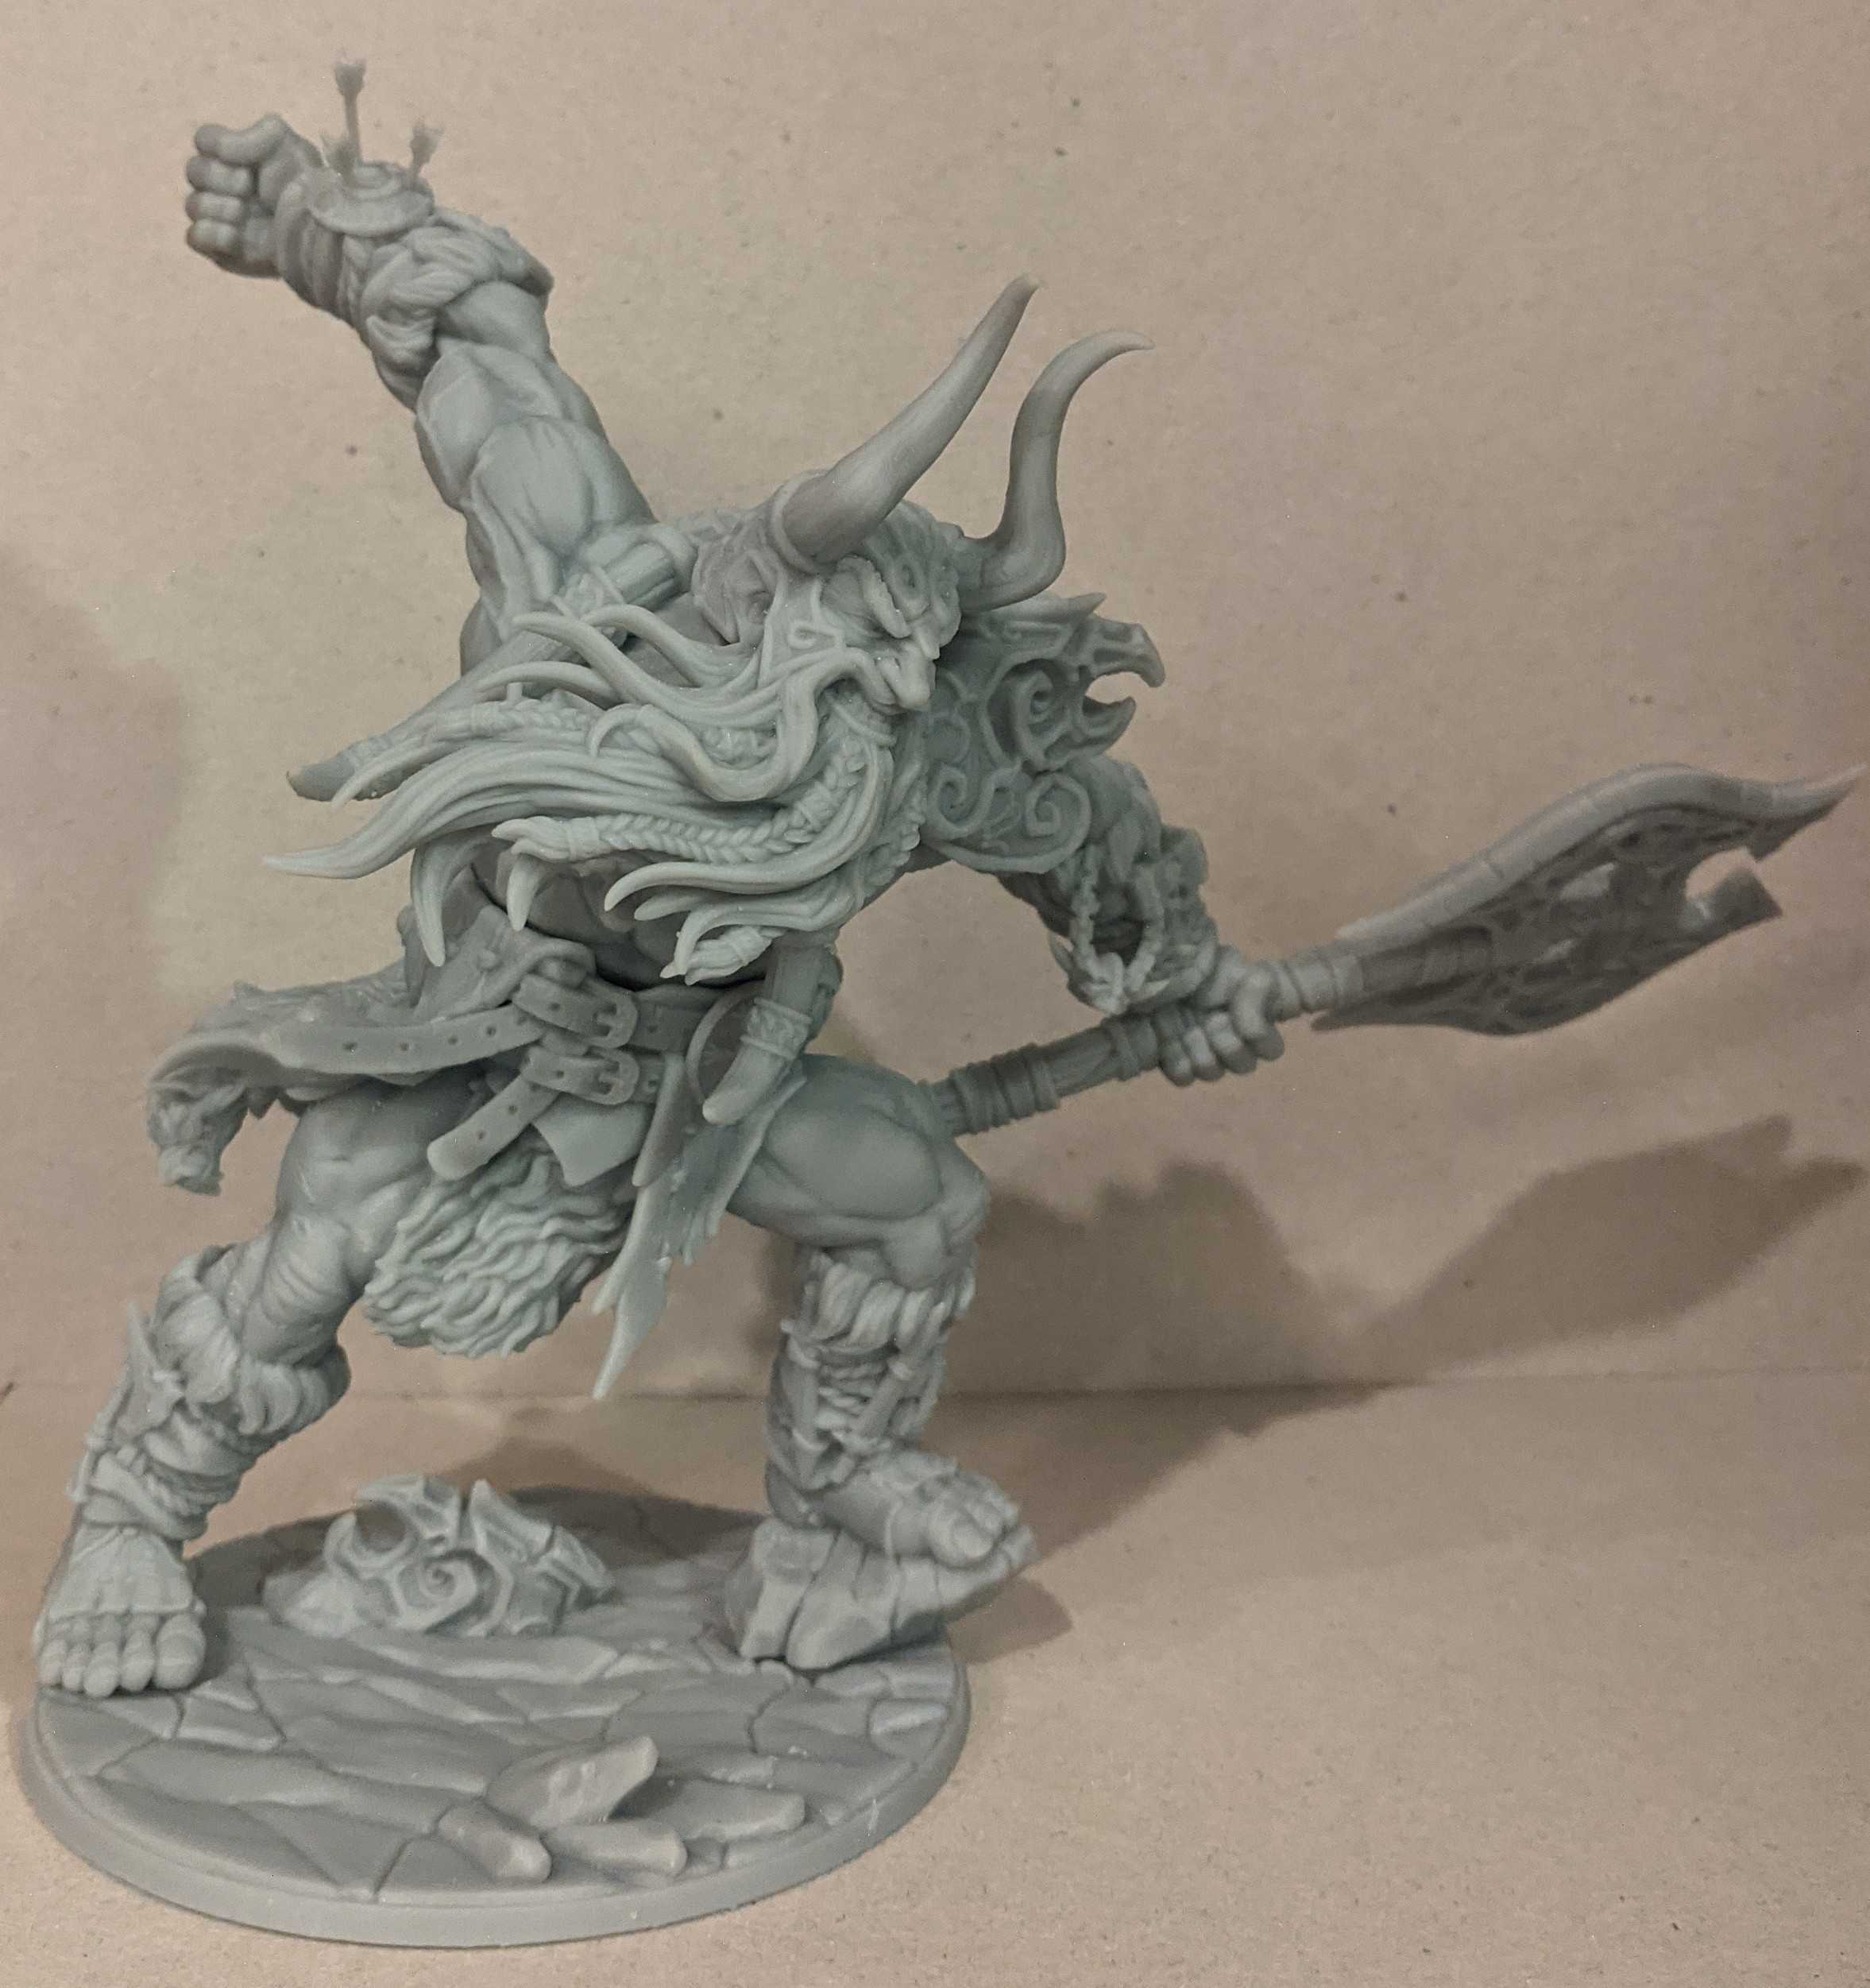
To reiterate my point that you shouldn’t be afraid of supports. Look at the number of supports on this build plate, and then look at the finished model. I didn’t post process or clean the model up in any way. I just removed supports, glued a few of the parts together, and took a picture.
Attachments:
-
-
-
AuthorPosts

- The forum ‘Getting Started’ is closed to new topics and replies.