 My Account


Description
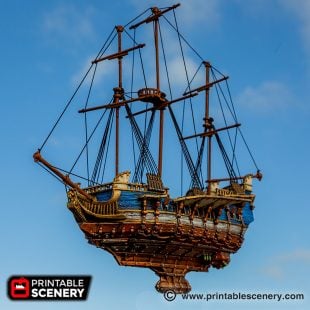
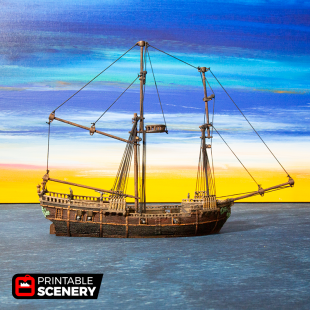
Whether it be by the mighty cannon’s blow, or a ballista’s piercing strike, a wartime encounter with a frigate is one not many ships survive.
Updates:
- 30 May 2018 (version 1.2) Scale of Frigate Wheel adjusted.
- 8 October 2018 (version 1.8) Changeable figureheads of the Maiden and Neptune added.
- 19 March 2019 (version 1.9) Rear cannon port hatches removed.
- 12 September 2019 (version 2.0) Vertical banding added to the Mid section.
- 29 November 2019 (version 2.2) Adjustment made to the level of Frigate Interior front.
- 23 March 2021 (version 2.3) Hull wood grain re-textured to prevent stringing.
- 2 September 2021 (version 2.4) Vertical banding added to mid section on re-textured version as well as rear cannon port hatches removed.
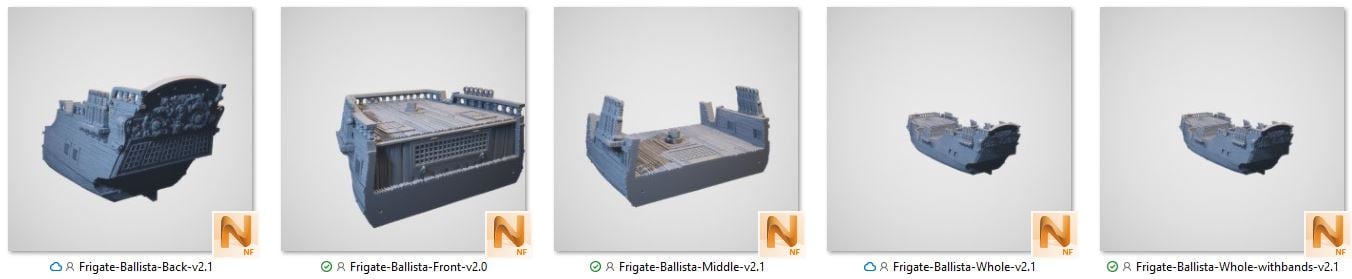
- 10 January 2022 (version2.5) Ballista Front added.
- 15 December 22 (version 2.6) Boat wheel options added to allow a Whole wheel resin print or print a filament connection version to allow the wheel to move.
- 31 January 2023 (version 2.7) Frigate-Interior-Back-Whole added to Frigate interior folder.
- 12 April 2023 (version 2.8) Correct Reference sheet for Frigate Interior added.
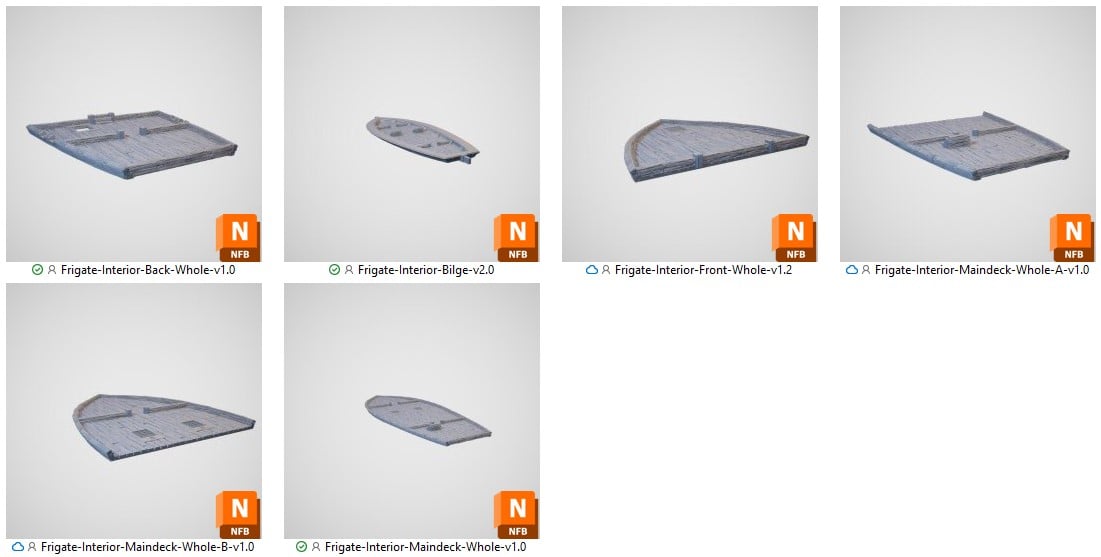
- 21 November 2023 (version 2.9) Frigate Interior Bilge added.
Notes:
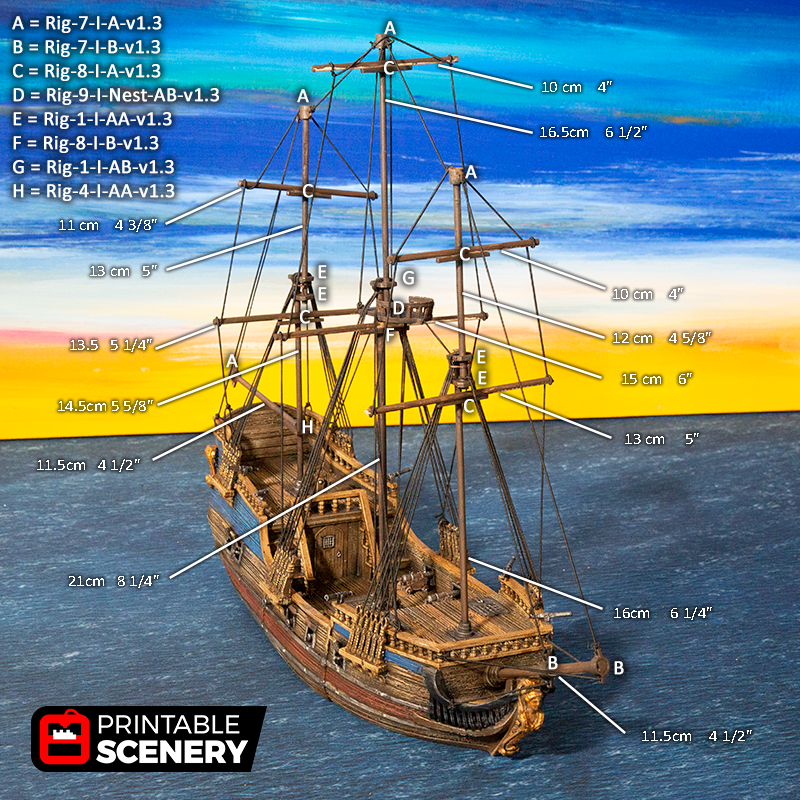
- Right-click on the image below and “Save As” to download the reference sheet for this pack.
- Perfect for Pirates, Freebooter, Blood and Plunder, or Dungeons and Dragons
- You will need 6mm (1/4”) and 4mm (1/8”) dowel for the masts, and black elastic string for the rope.
- Add supports touching build plates if you get too much stringing on the lower section of the hull or if using Cura select “make overhang printable”.
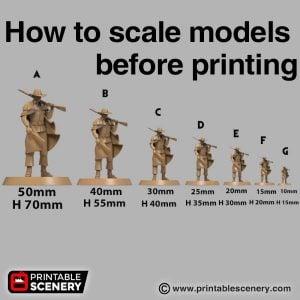
- Product measurements can be found in the image gallery.
Reference sheet for Medium to large printers
Reference sheet for Small printers
Reference sheet for Fittings
Reference sheet for Interior
Reference sheet for Ballista version
Reference sheet for Ballista version for Small printers

Reference sheet for Wake

Rigging
You will need 6mm (1/4 inch) and 4mm (3/16 inch) dowel for the masts and black elastic string for the rope.

patrick diederiks (verified owner) –
Hi, thank you again for a lovely model !
quick question: what are the diameters of the dovels for mast’s and ra’s
Jo Boorer –
You will need 6mm (1/4 inch) and 4mm (3/16 inch) dowel for the masts and black elastic string for the rope.
Dan Dinolfo (verified owner) –
For the balista version, are the beams/supports in the windows supposed to be removed? I know on the cannon ships I’ve printed (sloop/brig), there are often built-in supports in the cannon ports. These look different and look like they were sculpted to look like wood, so It’s harder to tell. I really don’t want to wreck 1/3rd of my ship finding out!
Sam Campbell –
You can remove the supports in the middle of the cannon ports.
oxen007 (verified owner) –
How do I decide which version of each rig to use? Some appear to use all 6 mm dowels, others a mix of 6 and 4 mm, the the last one all 4 mm dowels?
bfroehlich123 (verified owner) –
I second oxen007’s question. Which versions do we need to use if we follow your instructions to use 4mm and 6mm dowels for the masts?
Sam Campbell –
In our prototype rigging example, the Bow sprit and the bottom middle mast are 6mm in diameter and the rest are 4mm in diameter. We have included options in the zip to do other configurations if you wish.
jcarr –
What is the length and width of the Frigate Mk2? I can’t seem to find the dimensions.
Thanks,
Sam Campbell –
Total dimensions are 149.9mm x 406.2mm x 111.5 mm when assembled.
kreed346 –
What size elastic string do you use?
Sam Campbell –
1mm millinery elastic.
jonshouse (verified owner) –
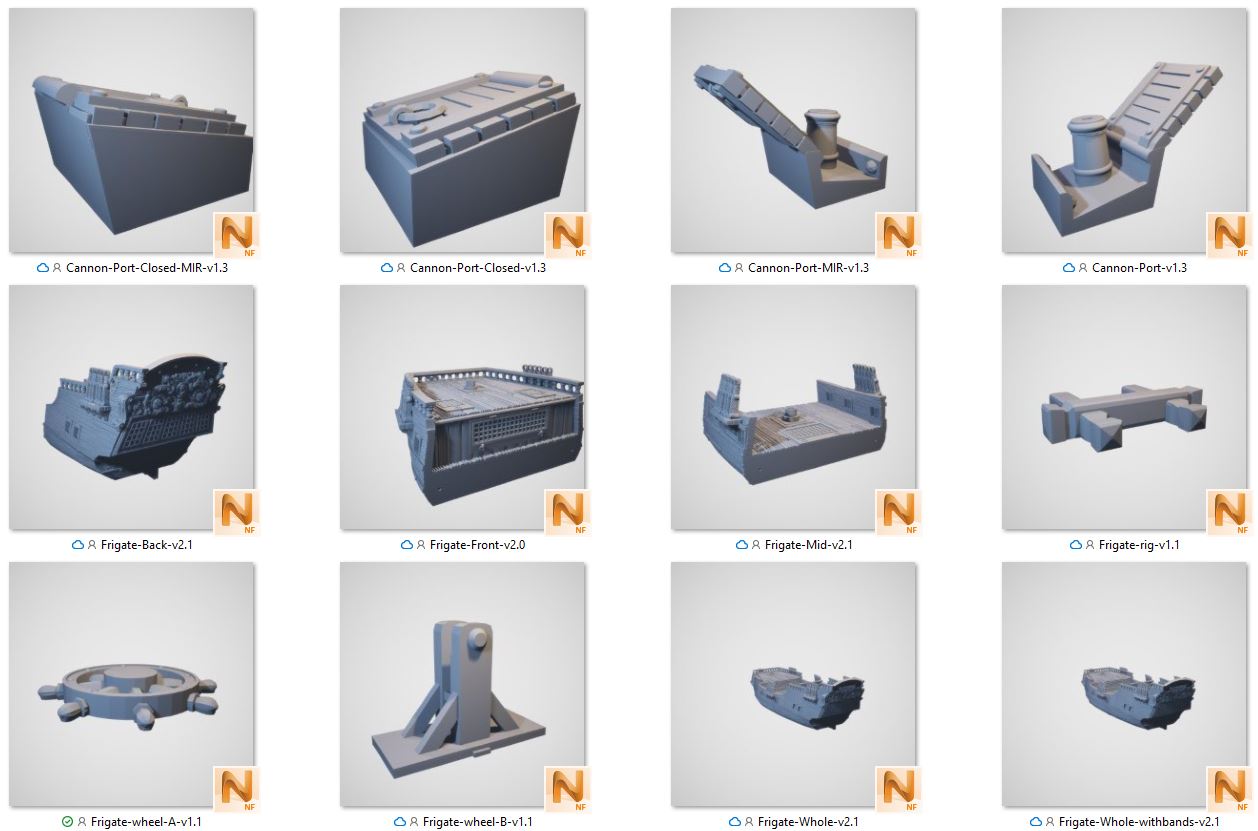
Great ship! I can’t seem to find the file for the piece which sits directly in front of the main mast though (in the 2 holes there and used to attach to some of the righing). It’s in all the main photos. Can anyone guide me to this file please? Thanks
Sam Campbell –
It’s the “Frigate-rig-v1.1” piece in the Frigate Mk2 folder.
jspotts (verified owner) –
What paints/colors did you use? In particular the railings.
Sam Campbell –
The railing was painted with Khaki Brown and washed in Sepia Shade.
arren.schlerf (verified owner) –
what are you using to keep the 3 parts together. It looks like you have holes in the hold for joining but what are you putting there?
Sam Campbell –
tehy are guide holes for 175mm Filament or 1.5mm gauge wire to align the sides while glue dries.
prosk8ter4d (verified owner) –
Will this ship print without supports?
Sam Campbell –
For best results switch on ‘supports touching build-plate’, this will avoid the stringing under the hull.
jakeh (verified owner) –
In the images, you have some external ribs on the joining seams. Curious what material you used? Hot glue, strip of wood, etc.?
Sam Campbell –
We’re doing an updated version of vertical banding shortly.
Voodoo (verified owner) –
Two suggestions: 1) instead of those little holes for filament or a wire, make the holes bigger and on the opposing piece make round nubs that fit into the holes like a snap together model. Easier to keep the model aligned when gluing. Or make the holes the same diameter as the masts. (2) make every other floor board slightly longer on each piece. When the model is put together there will be no seems on the floor going across the model. For example every second or third floorboard from each printed section interlocks with the next section eliminating the seem on the floor of the boat.
Sam Campbell –
Thanks for the suggestions, the filament holes are only meant as a temporary guide holes to set the two pieces together whilst glue hardens and dries.
Voodoo (verified owner) –
An addition to Jakeh’s question from August 19th will those vertical banding pieces be able to be printed separately or will we have to print out the whole boat again? Thanks and wonderful model. Will purchase other ships in the future when the vertical banding is sorted.
Sam Campbell –
The vertical banding has only been applied to the middle piece.
Voodoo (verified owner) –
Wonderful! Thanks for the quick reply! when will the file be updated for the ballista version? Sorry for all the questions.
Sam Campbell –
We’re looking at updating that as well soon.
Voodoo (verified owner) –
Should have been more precise with my question. When will the frigate’s middle piece, with the updated vertical banding, be ready for download? Thanks.
Sam Campbell –
This will be available soon. You will get notified by email automatically when this gets changed if you have purchase the product before.
3d1 (verified owner) –
So, for someone who isn’t familiar with ship terminology, what is the difference between the Ballista and non-Ballista versions? What do you get if you print one vs the other?
Sam Campbell –
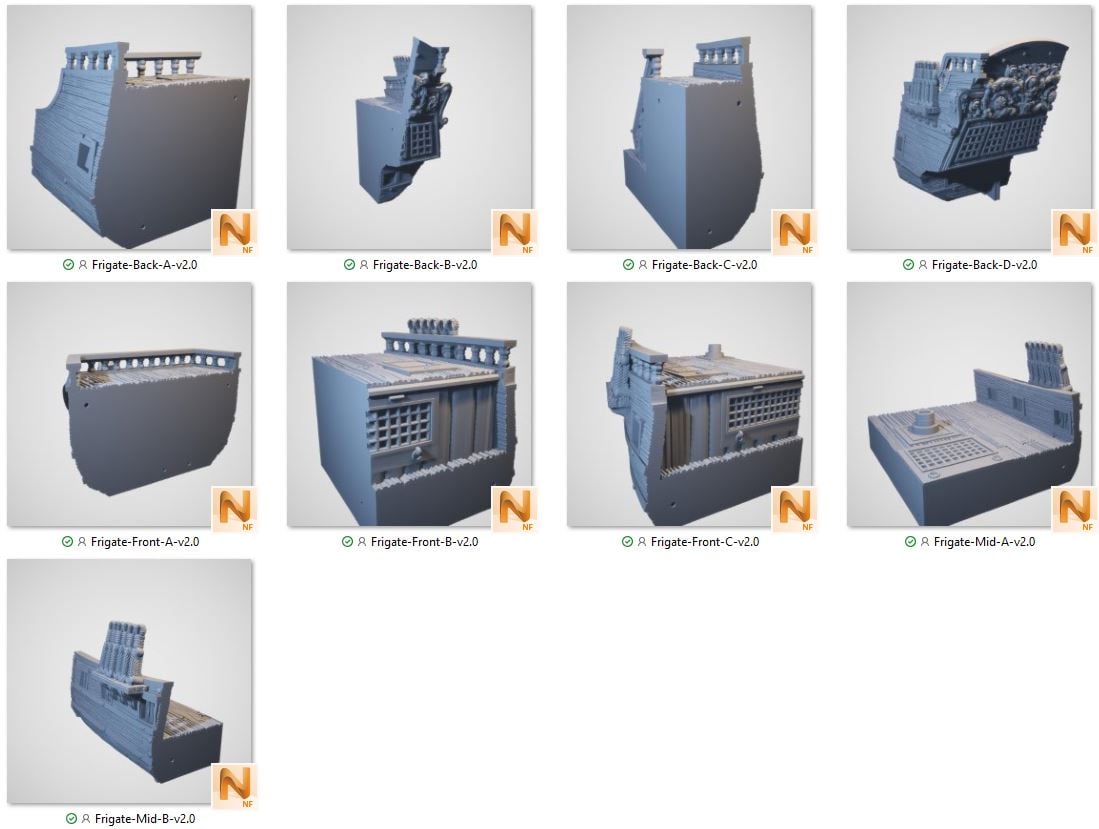
Ballista version has an open areas along the deck railing whereas non Ballista version has cannon ports in the deck railing.
3d1 (verified owner) –
Further detail form my previous question, I’ve opened both the Frigate-Front-v1.6.stl and Frigate-Ballista-Front-v1.0.stl files, and I can’t really tell the difference. I assume there is some reason of significante for choosing one and not the other. Thanks!
Sam Campbell –
Ballista version has an open areas along the deck railing whereas non Ballista version has cannon ports in the deck railing.
3d1 (verified owner) –
Great, thanks!
And there are actually 3 different front ends to choose from. I think some of the file differences are subtle, just makes it a tiny bit tricky.
3d1 (verified owner) –
Where is the hammock intended to hang?
Sam Campbell –
The hammock can be attached to any part that is high enough with string, otherwise it can be placed on the ground to represent location in the RPG decks.
3d1 (verified owner) –
Is there a suggested brand of elastic string to use (or where to get it)?
And what is the best diameter for wooden dowel?
Thanks!
Sam Campbell –
To rig you will need 6mm (1/4 inch) and 4mm (3/16 inch) dowel for the masts and black elastic string for the rope.
3d1 (verified owner) –
Thanks for all of the replies!
A quick note, the Frigate-Interior-Front-Whole-v1.0 file is only 43 layers tall in my slicer, where the Frigate-Interior-Back-Whole-v1.0 is 57. After printing both, you can tell it is missing the bottom-most layers of the file as you can see through the slats between the wood and the heights are different. I’m guessing just a small mistake in export.
Sam Campbell –
There are taller posts in the Frigate-Interior-Back-Whole-v1.0 that make it higher than Frigate-Interior-Front-Whole-v1.0. The walls are the same height.
3d1 (verified owner) –
One more quick suggestion if you roll out another version of this model! It would be really handy to get the Front, Middle & Back pieces of the boat with those sets of 6 ropes as separate pieces that could be glued on. My printer failed twice at that point (sadness after all the hours!). It would be fantastic to be able to print them separately, just knowing finicky printers might have a little more trouble with the small details there.
Thanks!
Sam Campbell –
It’s something we can look at in the future. In the meantime if you don’t want to print out the whole thing again, you can try slicing off the part that failed and reprint it slower and at a higher resolution and glue it on. https://blog.prusaprinters.org/cut-stl-models-3d-printing-meshmixer/
timothy.byrne1 –
This is an awesome model. We have a couple of questions, what is “MIR” on the canon’s? Roughly 8 ports for canon’s do you print 4 of each canons? 4 open and 4 open MIR?
Is there any video’s on how to paint it similar to the display picture?
Sam Campbell –
The Cannon’s are slightly skewed, so there needs to be a mirrored piece for the other side.
3d1 (verified owner) –
Thanks! I did just that (but with Tinkercad).
3d1 (verified owner) –
Previous comment, its the floor that is half the layers thick in the file, not the wall height. To clarify, if I use my slicer in Layer view, reduce the model down to 1 layer, the Interior-Back-Whole-v1.0 file has a full solid first layer. The Interior-Front-Whole-v1.0 file does not have this, it is immediately the broken wood slats with gaps between. It makes the printed model quite brittle in comparison.
Thanks again!
Sam Campbell –
Ok, we will get this updated.
3d1 (verified owner) –
Really like how study & weighty this turns out (finishing my last piece today then can assemble)! Curious though, have you considered a hollow version to reduce print time & filament usage? I imagine would have to print the deck as a separate piece & glue on top, but could be really handy option.
Sam Campbell –
Thanks for the suggestion. We have considered hollow versions in the future/
benjaminapetersen (verified owner) –
Two more Qs!
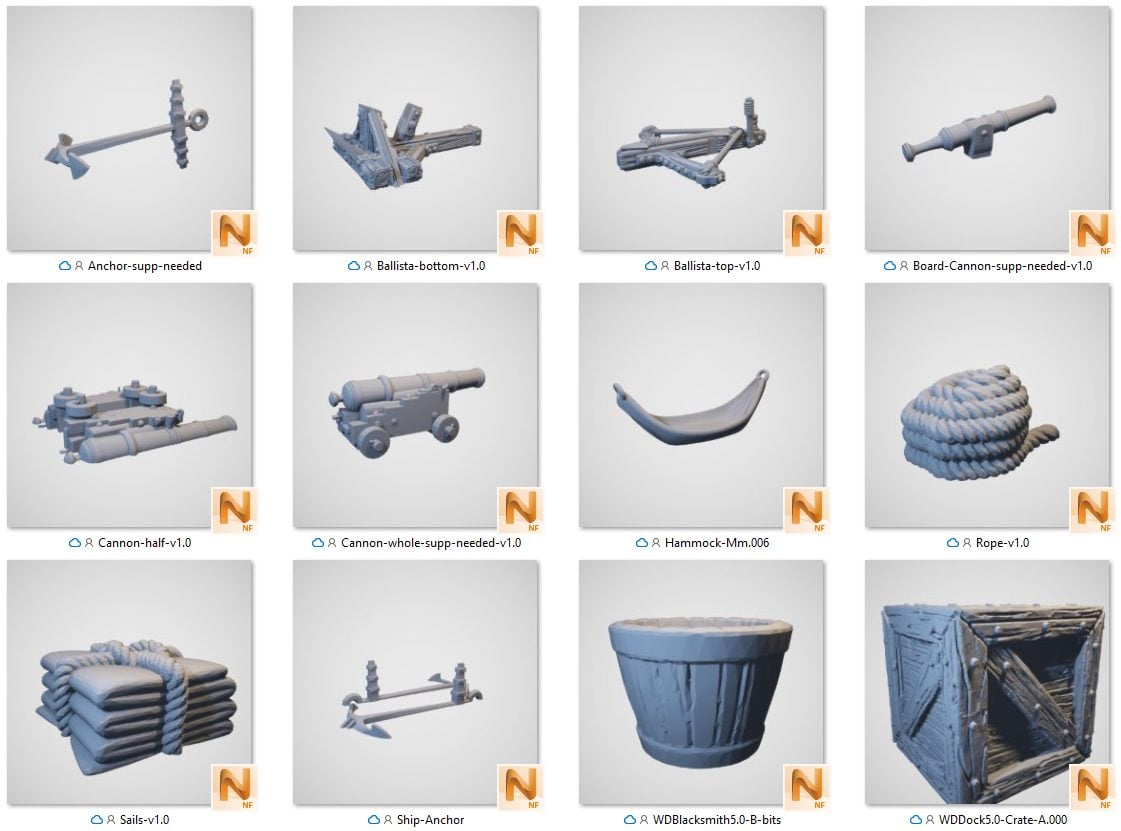
Is there any way to attach the anchor or is it just for decor?
Second, the frigate-rig piece, looks kind of like an “A” made of wood. Not sure what that is for, either.
Thanks!
Sam Campbell –
The Anchor is for decor. The Frigate-rig piece is placed in the 2 indentations just in front of the main mast.
benjaminapetersen (verified owner) –
Ok one more 🙂
The rig6 piece that goes on the ends of the crossbeam, is this recommended? I see a lot of the pics do not use it, and instead just wrap the string around the beam. Wondering if that piece was just added at a later date.
Sam Campbell –
It’s optional and was from the original design.
racm32 (verified owner) –
The open cannon ports wont fit into the holes without cutting half off and sanding like crazy. Is there a better way to make them fit?
Sam Campbell –
You can try shrink them by 1-2%. There are 2 lots of cannon ports that alternately fit in one side.
apolloxer (verified owner) –
Two questions about the Rig piece 6, as it doesn’t appear in the pictures nor in the instruction video: Do I cut a fitting hole, or is it supposed to be glued to the outside? And how do I include it in the rigging?
Sam Campbell –
Rig 6 can be glued on to the end of the mast.
patrick carberry (verified owner) –
Hi, you recommend printing with 20% infil, would there be any major issues dropping it down to 15-10%?
Nicholas Jebson –
Hey Patrick, not at all. When we first posted that our recommended infill was 20% but we have now revised it to 10% as it will still hold its rigidity but cut down on the weight of plastic.
chrisc86 –
I am looking to print one of these for blood and plunder. Does this updated one compare to the blood and plunder version, size, rules ect?
Sam Campbell –
Yes, it is compatible with Blood and Plunder.
dastrappe –
Hi, I am looking to print this as a display, but was wondering if you knew the lengths for the different dowels, (reference sheet with labels maybe)? 1. I want to make sure I buy enough, and 2, I want to make my boat look like the one in the picture.
Thanks.
Sam Campbell –
Yes it’s down in the description. Here is a link https://www.printablescenery.com/wp-content/uploads/2018/05/Frigate-Rigging-1-768×768.png
rslendermon –
Will this print on a Photon/ resin printer? It appears you sliced down to that size plate but just checking. Thanks
Nicholas Jebson –
The small printer cuts for the frigate is sliced for a 120 x 120 x 120 build volume. One or two pieces of it may not fit on the Photon (we sliced them well before small resin printers took off so hadn’t thought to accommodate them) but would with a small decrease in their scale (possibly 95%).
Niels Saes (verified owner) –
What settings do you guys recommend for supports?
Sam Campbell –
Print supports touching buildplate. We’re working on re-texturing this for printing without supports in the next month or so.
mrebivens (verified owner) –
Sorry if anyone has already covered this somewhere… but has anyone tried making sails for this? I assume use some sail cloth, cut to size, and make some holes for rigging lines?
Any tips on dimensions?
Mike –
We haven’t tried sails on ours yet so will be very interested to hear how you go. If I were to do it I would start with them larger than you think you will need and trim as necessary.
JediAcademyDropout –
I really want to purchase these STL files, but I only have an Elegoo Mars printer. I know there is a small form factor version in the files, but is it small enough to fit on the Mars? Build dimensions are 120 x 68 x 155mm
Nicholas Jebson –
The largest part of the Frigate in the small printer cuts is the bow, measuring 142mm x 146mm x 71mm, which is obviously way too big for the Elegoo mars but we can check this week to see if we can cut that one section smaller.
JediAcademyDropout (verified owner) –
Sounds awesome! I will also be trying to play with the files a little (wanting to add magnets to the pieces for easier transport). I’m excited to hear us little printers being considered for an update! Thank you!
Nicholas Jebson –
An interesting idea I have seen is when hollowing the part for a resin print, to make the drain holes the right size that the magnet can be set into them.
nathanhale68 (verified owner) –
So I have downloaded the frigate and looking at the updates
“19 March 2019 (version 1.9) Rear cannon port hatches removed.”
“12 September 2019 (version 2.0) Vertical banding added to the Mid section.”
are listed however the parts do not appear to have these changes. Where can I find these updated parts?
Mike (verified owner) –
Hi Nathan,
Thanks for pointing that out! We’ll get it fixed up and you’ll receive an email when the update comes through 🙂
Gadiel Sunna (verified owner) –
Hi there, I’m still relatively new to 3D printing and was curious if this model can be printed on a Photon Mono?
Thanks!
Mike (Printable Scenery) (verified owner) –
Hi Gadiel,
You should definately be able to print this on a Photon Mono, the Small Printer Cut folder in the download contains pieces that fit within a 120mm X 120mm x 120mm built plate size
Gadiel Sunna (verified owner) –
Thanks for the reply Mike. I just double checked and my printer build plate size is 130mm x 80mm x 165mm. Does this mean that I am not able to print it with the small printer cut?
Mike (Printable Scenery) (verified owner) –
Hi Gadiel,
I had a quick look and all the small printer cuts should fit on your build plate for the main hull. You might need to turn one or two pieces to suit but that’s easy enough to do in your slicer.
Gadiel Sunna (verified owner) –
Thanks again for the help Mike. 1 more quick question, what are the dimensions of the finished product?
Mike (Printable Scenery) (verified owner) –
My pleasure 🙂
The total size of the ship depends on how long you cut the masts. The size of the full hull, printed at 100% is 406mm x 150mm x 112mm without masts.
Hope that helps and Happy Printing!
Kayoz (verified owner) –
Is there a guide somewhere to see how the ship was painted?
Kayoz (verified owner) –
Or more specifically, how the blue and red/brown on the sides were painted. Also the metal area around the mast 🙂
Mike (Printable Scenery) (verified owner) –
For the Blue its Crystal Blue, highlighted with Voidshield Blue. The Red is Abomination Gore highlighted with Mars Red. They both get a wash on Strong tone to shade and age them. The metal is simply Gun Metal with a Strong Tone wash and highlighted with Shining Silver. Theyre all Army Painter Paints so hopefully won’t be too hard to find.
Hope that helps 🙂
michael.rome (verified owner) –
First, I am absolutely loving this model. I bought a different model from someone else on MyMiniFactory, and it was miserable. I thought I was doing something wrong. I printed this Frigate and it looks AMAZING. I plan on buying and printing as much of your stuff as my budget allows.
I have a question though, regarding the down rods. I bought the 1/4 and 3/16 rods from Amazon. The 1/4 seems a bit too small for the hole, and the 3/16 won’t fit in the smaller holes. Did. I order the wrong size, or what am I missing? I printed the model as is, no scaling or resizing. The dowels I got are at the amazon link below. Please advise, I would love to rig this up to have for my campaign this weekend
Thanks
1/4 inch: https://www.amazon.com/gp/product/B07SCZ6TY1/ref=ppx_yo_dt_b_asin_title_o04_s00?ie=UTF8&th=1
3/16 inch
https://www.amazon.com/gp/product/B07DMX7ZLH/ref=ppx_yo_dt_b_asin_title_o04_s01?ie=UTF8&psc=1
Mike (Printable Scenery) (verified owner) –
Hi Michael,
Glad to hear you’re liking the Frigate! Be purchased our rods in metric which after some looking it is slightly different. Everything I check says that the 6mm rod is just under 1/4 inch so explains it being a tad small. The 4mm is closer to 1/8 inch which should fit better. Ill update the info on the page now but I hope that helps!
Look forward to seeing the end product!
Yannick Wouters (verified owner) –
Hi, I will be printing this model with ballista. However, I cannot find the Ballista “front” version. In the map “ballista”, there is only a “back” and “middle”, but no “front”. The “whole” versions in the ballista map clearly have a ballista port at the railing in front, that fronts in other maps do not have.
Where can I specifically find the “ballista front”?
Nicholas Jebson –
Hey Yannick, thanks for pointing this out to us. We had a look and the front of the ballista had been put into the development folder when we updated it rather than the main folder. We are rectifying this and it should be in the main folder to re-download later today.
Todd Zino (verified owner) –
So, a couple years ago there were questions about vertical banding pieces that cover the joints where the three sections fit together. You guys replied an update was coming soon. I guess that never happened?
Mike (Printable Scenery) (verified owner) –
Hi Todd,
It looks like those vertical bands were decided to be left out from the last update. I’ll put it on our potential future model update list. If you currently own the product you’ll receive an email notifying you of the update
theartificersforge (verified owner) –
Hi guys,
Has anyone printed this at 32mm scale (ie 110% size increase) and, if so, what size dowels do you recommend for the rigging? The ones suggested – 4mm and 6mm – obviously do not fit the scaled up model…
Many thanks,
Jim
Mike (Printable Scenery) (verified owner) –
We havent here but I would say 8mm & 5mm should do the trick. You could always make a small cylinder in blender or meshmixer in a few sizes and print them out to try in the scaled up mast-holes before you go and buy the dowel for it.
Erik Turner (verified owner) –
OK, this thing is awesome, but I have a few questions:
1)Where is the guide for what lengths to cut the masts to? It would be helpful to have files with written instructions with diagrams or pictures on what lengths to cut and the exact parts list in the archive.
2)Where are the rigging bits? The mk2 2.5 model I downloaded doesn’t have the crow’s nest or the various doodads to attach to the masts or tie off rigging.
3)Where are the ballista parts? The files I downloaded only seem to have the cannon variant.
4)Where are the interior floor layouts? none of those files in there either.
5) Or the fittings. None of those in the files either.
6) I had the Lost Ships bundle when I backed Halflings and hadn’t gotten around to downloading things till now, was assuming all the pieces for the ships were included in that?
7) Any recommendations for printing in resin? I’m planning to print this in resin on the Phrozen Mega8k for the big chunks, and the mighty4k or mighty8k for the rest. (50 micron layers probably)
Matt Barker –
There is an image at the bottom of the page that shows the lengths to cut
Erik Turner (verified owner) –
Thanks! I downloaded the files again and now I have all the missing files. Looking forward to building this thing.
Matt Barker –
Awesome !
AkiTIMtsu (verified owner) –
Are any plans to make resin printable versions?
Jo Boorer (verified owner) –
The Frigate MK2 has small printer parts that could be resin printed by hollowing and adding supports.
mikerotech (verified owner) –
Love the ships!
Printing out the frigate mk2 2.6..
I am unable to find the frigate-Interior-back-whole in the large printer format.
Would that piece be the same as the one included in the flying frigate?
There is the back interior deck included in the small printer folder (4 pieces) but would rather print is as one.
Thanks!
Jo Boorer (verified owner) –
Yes, you are absolutely correct. Good spotting. I have now updated this product with Frigate-Interior-Back-Whole added.
benezra13 (verified owner) –
I cant find the masts on the file, how do I get those?
Jo Boorer (verified owner) –
We recommend dowel for the posts.
You will need 6mm (1/4”) and 4mm (1/8”) dowel for the masts, and black elastic string for the rope.
stottsa (verified owner) –
Would it be possible to add some sort of alternate stls for joining mechanism for the small printer boat sections plus maybe the interior cannon ports? Example, OpenLOCK or magnet holders or something? The current ones seem to have a spot for pins(?), do you have any instructions for what the intended use was for these?
Jo Boorer (verified owner) –
These are filament holes to help glue these pieces together.
s.a.deter (verified owner) –
I just purchased and downloaded this model, and the interior files in the download are all v1.0 or v1.2 while the reference picture shows v1.5 and v1.6 files. Is it possible to get these newer versions? The main reason I bought this was for those interiors. Also, the Maindeck has hatches that I assume would lead down to another level like a hold or something. Would it be possible to get a file for that lowest smallest level? Even if it’s empty of any features, I was wanting to have that space available for my players to access.
Jo Boorer (verified owner) –
Thanks for pointing this out. The files for the interiors are correct but the reference sheet was for the Flying Frigates interior. Have now updated this.
Love your suggestion for the Bilge and will add it to our list of updates.
Florian Letz (verified owner) –
Hello, I just purchased this ship and downloaded version 2.2.8 an tried to slice it with the newest stable UltiMaker Cura.
The following files produce an error when slicing (just “an error occured”):
Frigate-Front-v2.0
Frigate-Front-With-Neptune-v2.0
The Maiden one and the “for small printers” version does work though. I tried to open it in windows 3d builder, which often offers to fix broken models, but it does not in this case.
Any help would be greatly appreciated!
Jo Boorer (verified owner) –
Try rotating the model on the build plate in cura.
plagueboy99 –
helo
is this intended to be printed on a resin printer or a filament printer?
approximately how much resin/filament would it take to print this at 20% infill and how would that compare to 10% and 15%?
Jo Boorer (verified owner) –
This was made to be FDM printed but people have used the small printer parts to resin print this model. If you hollow these parts you use around 520g just for the ship parts not the accessories as well. To print just the three ship pieces in FDM at 20% infill uses 723g, at 15% infill is 620g, and at 10% infill 529g.
m g (verified owner) –
Would it be possible to get the figureheads as separate pieces so they can be resin printed?
Jo Boorer (verified owner) –
I have added your suggestion to our models update list.
dutsmith24 –
A really good looking piece. I have several questions before I buy:
I have an Elegoo Saturn S resin printer, is it possible to print this model?
If it can be printed, does the model come set to be printed hollow or is the default a solid print?
Jo Boorer (verified owner) –
This model was made for FDM printing but some customers have printed our ships in resin using the small printer parts and hollowing them and adding supports.
JTprint (verified owner) –
With new larger FDM printers out in the market now, would the team be able to make whole figures with the different figureheads?
Jo Boorer (verified owner) –
I will add this to our suggestion board.